
How to upgrade Magento 2.x. - Astrio Guide
Introduction
Nowadays it’s important to keep your Magento store up-to-date when you manage your e-commerce store. You should always monitor the timely updating of Magento 2 to keep it secure and stable. The purpose of this article is a review of all possible upgrade options and all possible errors and its fixes. We hope our article will save your time during the upgrade process.
The examples described in this article are suitable for Magento v. 2.3.x.
Now the most modern versions of Magento are 2.3.x (see Source 1). Each new Magento version (release) is accompanied by Release notes documentation, which is a full description of new features, security patches and improvements. In this article, we will analyze in details the upgrade to the latest version of Magento 2.3.5-p1 (see Source 2).
Attention: always backup your files and database before attempting to upgrade. It is also recommended to do the update on a separate copy of the store, and then upload the updated and tested version to the production server. With a platform as complex as Magento 2, you cannot predict that the upgrade will succeed. Something may go wrong. You should always be able to restore the system.
Magento 2 Update
There are 3 options for updating the Magento 2 system:
- Using Composer and Terminal
- Using the web setup wizard
- Downloading the version manually and replacing the files (not recommended)
The updating by Composer is most preferable. That’s why we will review the second and third options superficially.
Updating by Composer
Composer is a dependency manager for PHP. It can help to update the store with minimal issues and efforts. Installation instructions are provided in source 3.
Let's overview the upgrade of the Magento 2 using the Composer on the following example upgrade path: current Magento store version is 2.3.2 and the destination version for upgrade is the Magento 2.3.5-p1.
If you use GIT, make sure that there are no unauthorized changes in the current build. Otherwise, if you have to roll back the update, you may broke the store.
The whole upgrade process can be considered in few steps:
1. Switch to maintenance mode, this can be done with the command:
php bin/magento maintenance:enable
2. Request the information about the latest available versions of Magento:
composer show magento/product-community-edition 2.3.* --all | grep -m 1 versions
3. Make Composer use the latest version (replace 2.3.5-p1 with the newest):
composer require magento/product-community-edition=2.3.5-p1 --no-update
If you are using Magento 2 commerce, the command will be different:
composer require magento/product-enterprise-edition=2.3.5-p1 --no-update
4. Update Composer, making it to download the new version and update all files:
composer update
The application of the first four steps is as follows:
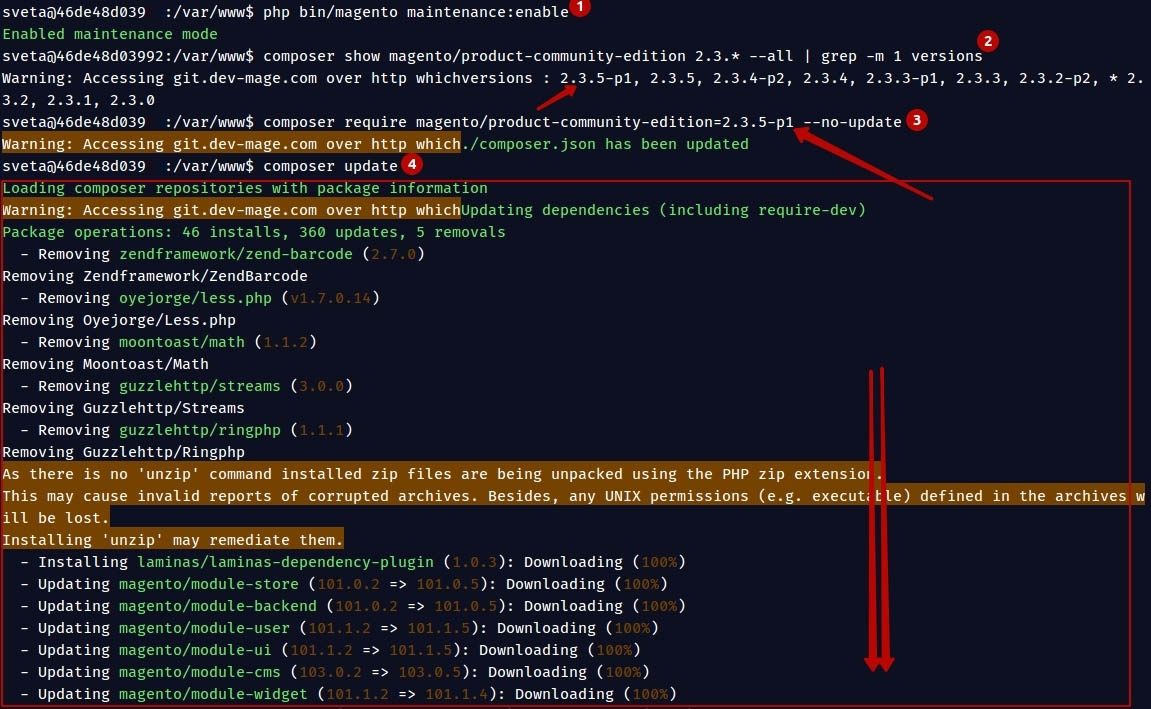
After completing the 4th step, we can make sure that many system files have been updated:
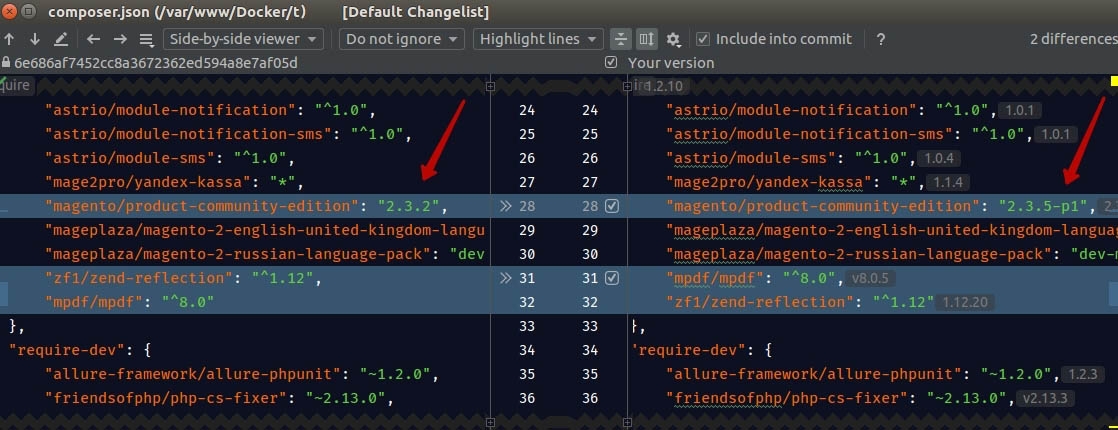
A new version is now marked in “composer.json”:
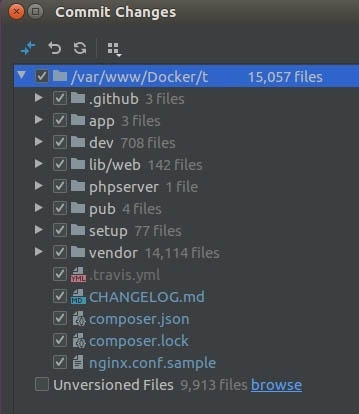
5. On this step you need to add all the new files to the GIT, commit the changes and upload, so that further adjustment can be easily rolled back.
6. After a successful update and commit, you need to run two commands, updating the database and compiling:
php bin/magento setup:upgrade
php bin/magento setup:di:compile
Errors may occur during the execution of these commands. They are described below under “Possible upgrade issues”. Keep in mind that it is possible that you will have to change the code of your modules or update third-party modules to the latest versions.
7. In the case of successful executions of commands, turn off maintenance mode and run the reindex:
php bin/magento maintenance:disable
php bin/magento indexer:reindex
After the successful completion of the 7th step, you can load the store and test it for possible upgrade issues. The possible upgrade errors will be described and analyzed further, in the "Possible upgrade issues" cheaper of this article.
The current Magento version can be viewed on the main page of the store admin panel:

UPDATE USING THE SETUP WIZARD
Magento 2 has an item menu in “System => Tools” section called the “Setup Wizard”. You can use it to install extensions purchased through the Magento Marketplace or to upgrade Magento to new version.
Here you need to select the appropriate update item and then follow the instructions.

At the start of the upgrade, Magento will ask for credentials. You can get it at https://marketplace.magento.com/customer/accessKeys/ (see Source 1). Remember: the username is the public key, and the password is the private key.
The system will require you to select the update version, you may be asked to install additional plugins. You need to agree with the requirements. However, it is better to skip the backup step and manually back up your files and database. This step may overload the system or freeze it, and you will need to start all over again.
DOWNLOADING THE VERSION MANUALLY AND REPLACING THE FILES
This option is not recommended because it is more likely to break the current system. You need to use it if the previous two upgrade options failed for any reasons.
You need to download the latest version of Magento 2 from the official Magento website, and unzip it in the main Magento folder. This will overwrite the main system files.
Then run:
php bin/magento setup:upgrade
php bin/magento setup:di:compile
php bin/magento maintenance:disable
php bin/magento indexer:reindex
The upgrade is done.
Possible upgrade issues
1. UPDATE OF INPUT PARAMETERS IN CHILD CLASS METHODS
Often with an upgrade to Magento 2, external modules need to be updated.
For example, at the step of executing php bin/magento setup:upgrade command, the following issue may occur:

Error text: Warning: Declaration of Amasty\BannersLite\Model\BannerImageUpload::moveFileFromTmp($imageName) should be compatible with Magento\Catalog\Model\ImageUploader::moveFileFromTmp($imageName, $returnRelativePath = false) in /var/www/app/code/Amasty/BannersLite/Model/BannerImageUpload.php on line 76
This issue occurs in the external module “Amasty_BannersLite”. The class “Amasty\BannersLite\Model\BannerImageUpload” of the method “moveFileFromTmp” takes one argument, but its parent method now takes two arguments. A having the same exact default argument values is also important.
The class “Amasty\BannersLite\Model\BannerImageUpload” of the method “moveFileFromTmp”:
<?php
namespace Amasty\BannersLite\Model;
class BannerImageUpload extends \Magento\Catalog\Model\ImageUploader
{
    public function moveFileFromTmp($imageName)
    { ... }
}
The class “Magento\Catalog\Model\ImageUploader” of the method “moveFileFromTmp”
<?php
namespace Magento\Catalog\Model;
use Magento\Framework\File\Uploader;
class ImageUploader
{
    public function moveFileFromTmp($imageName, $returnRelativePath = false)
    { ... }
}
As this is an external module, there are 3 options for resolving the situation:
- Upgrade the module, in case there is updated module version for Magento 2.3.5.
- Disable the module if it is not used and fix the error manually so that the error does not appear again during compilation.
- Write a message to the developers of the module with the question about compatibility of the module version with Magento 2.3.5.
During our update, option No. 2 was selected. The module was disabled, and its code was corrected:
<?php
namespace Amasty\BannersLite\Model;
class BannerImageUpload extends \Magento\Catalog\Model\ImageUploader
{
    public function moveFileFromTmp($imageName, $returnRelativePath = false)
    { ... }
}
2. CAN’T CREATE DIRECTORY
This error may also occur at the execution of step php bin/magento setup:upgrade.
Error text: Fatal error: Uncaught exception 'MagentoFrameworkExceptionLocalizedException' with message 'Can't create directory /var/www/html/site/var/generation/Magento/Framework/App/ResourceConnection/.' in /var/www/html/site/vendor/magento/framework/Code/Generator.php:103 Stack trace: #0 /var/www/html/site/vendor/magento/framework/Code/Generator/Autoloader.php(35): MagentoFrameworkCodeGenerator->generateClass('MagentoFramewo...') #1 [internal function]: MagentoFrameworkCodeGeneratorAutoloader->load('MagentoFramewo...') #2 [internal function]: spl_autoload_call('MagentoFramewo...') #3 /var/www/html/site/vendor/magento/framework/Code/Reader/ClassReader.php(19): ReflectionClass->__construct('MagentoFramewo...') #4 /var/www/html/site/vendor/magento/framework/ObjectManager/Definition/Runtime.php(44): MagentoFrameworkCodeReaderClassReader->getConstructor('MagentoFramewo...') #5 /var/www/html/site/vendor/magento/framework/ObjectMana in /var/www/html/site/vendor/magento/framework/Code/Generator.php on line 103`
In this case, you need to make sure that the current user has write permissions in the “pub”/”static” and “var” folders. Write permissions can be set using the command:
chmod 755 var pub/static
3. UPDATE OF THE CONSTRUCTOR AT CHILD CLASSES
Default modules require updating as well as external ones.
For example, in the compilation step (command bin/magento setup:di:compile), we encountered this error:
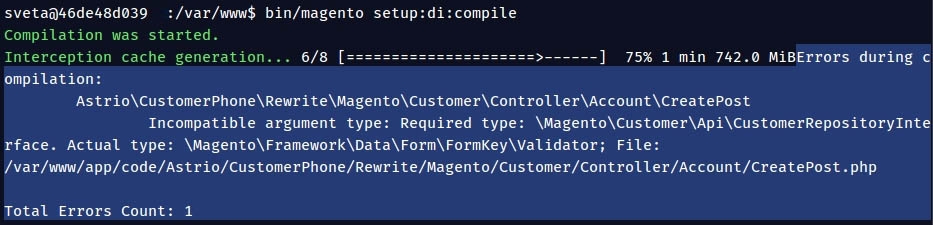
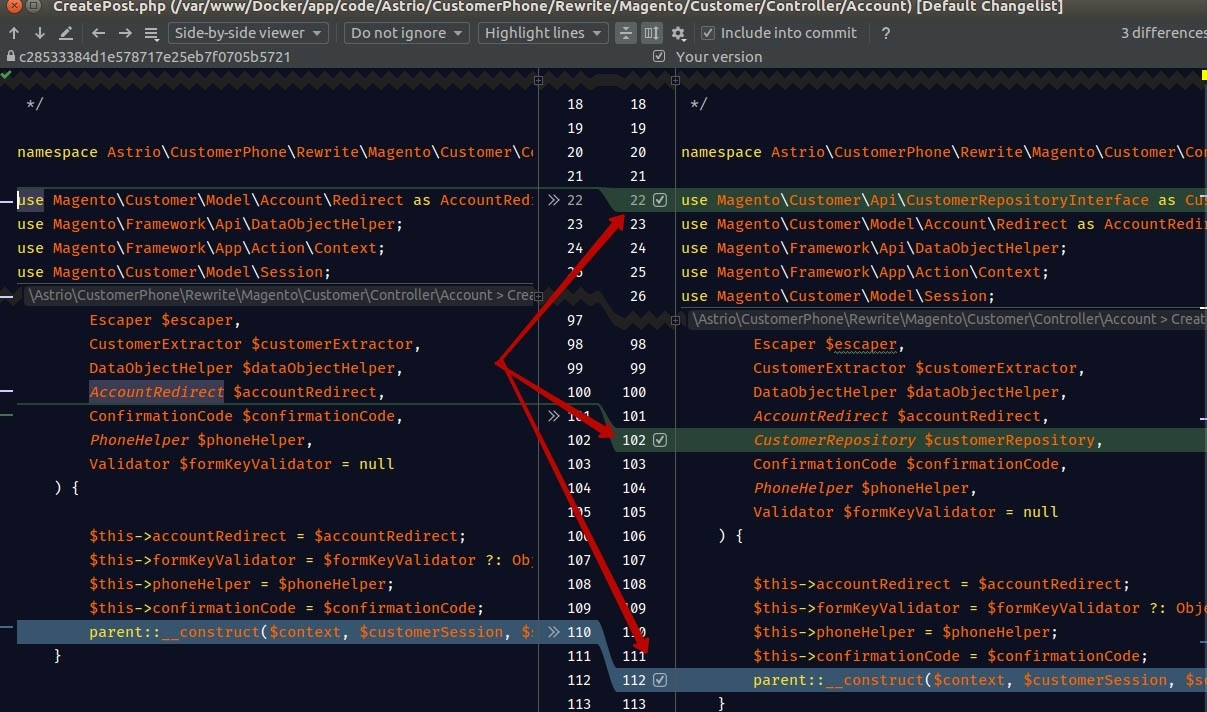
Error text: Astrio\CustomerPhone\Rewrite\Magento\Customer\Controller\Account\CreatePost Incompatible argument type: Required type: \Magento\Customer\Api\CustomerRepositoryInterface. Actual type: \Magento\Framework\Data\Form\FormKey\Validator; File: /var/www/app/code/Astrio/CustomerPhone/Rewrite/Magento/Customer/Controller/Account/CreatePost.php
The cause of the issue is that in one of the modules written by then there is a class “CreatePost”, inherited by \Magento\Customer\Controller\Account\CreatePost. It has a constructor. With the Magento update, the class \Magento\Customer\Controller\Account\CreatePost and its constructor have been updated too. Accordingly, the system requires updating the constructor of our class as well.
Thus, the solution of this problem was to add another parameter to the class constructor:
4. OUTDATED EXTERNAL MODULES
After a successful database update and compilation, you need to be prepared that failures can occur anywhere on the site. For example, one of the problems may be an outdated external module. For example, after updating Magento on one of the admin pages, the following error occurred:
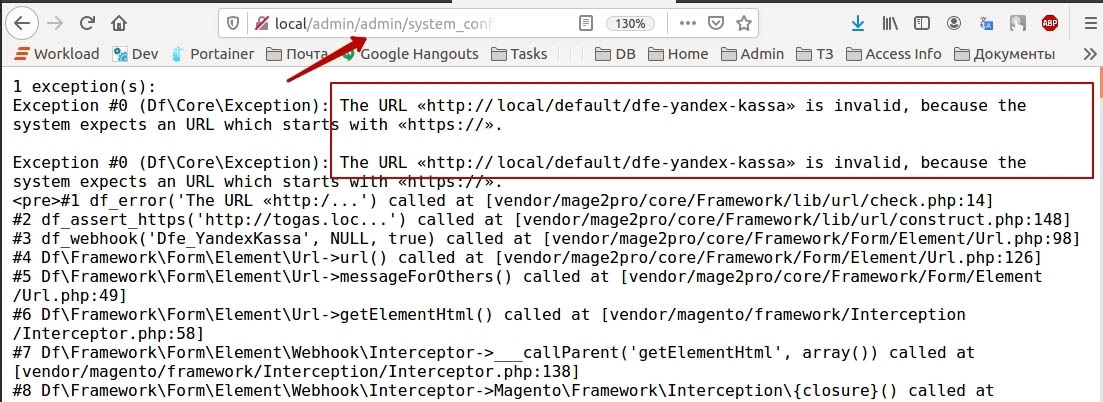
Error text: main.ERROR: The URL «http://host.local/default/dfe-yandex-kassa» is invalid, because the system expects an URL which starts with «https://». [] []
The solution to this problem was to turn off the dfe-yandex-kassa module and contact its developers to update it to the latest version or provide you with an updated package.
5. DEVELOPMENT OF THE THEME
The issues with the theme are quite frequent after the Magento upgrade. If you use the standard Magento theme, you must make sure that its version will work in the updated Magento. Or that the developers have released such a module and it can be updated. If the theme was developed and modified by you, then be prepared for improvements. For example, in our case, when loading the main page of the site, the following error occurred:
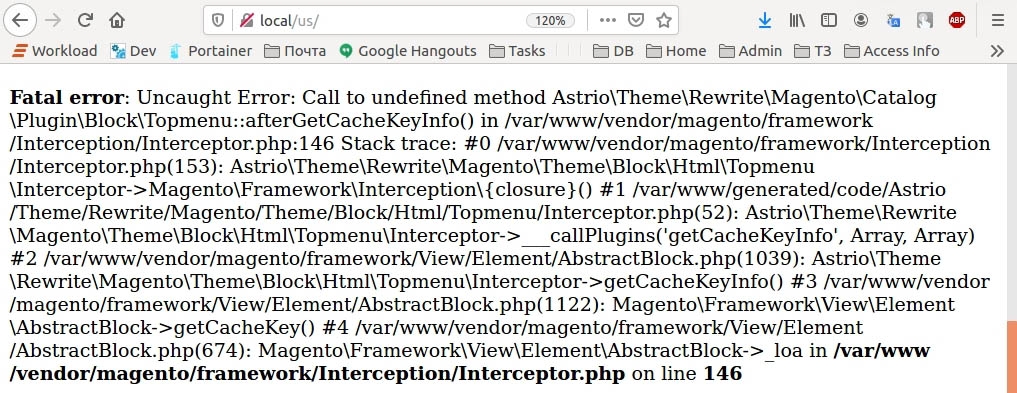
Error text: Uncaught Error: Call to undefined method Astrio\Theme\Rewrite\Magento\Catalog\Plugin\Block\Topmenu::afterGetCacheKeyInfo() in /var/www/vendor/magento/framework/Interception/Interceptor.php:146
The fact is that in one of our modules we previously redefined the class Magento\Catalog\Plugin\Block\Topmenu.
The method added with Magento update Magento\Catalog\Plugin\Block\Topmenu::afterGetCacheKeyInfo(), but the class Astrio\Theme\Rewrite\Magento\Catalog\Plugin\Block\Topmenu stayed the same.
A simple solution to this issues was to add a new method to the class of our module:
<?php
\Magento\Framework\Component\ComponentRegistrar::register(
    \Magento\Framework\Component\ComponentRegistrar::MODULE,
    'Vendor_OrderDeliveryDate',
    __DIR__
);
<?php
namespace Astrio\Theme\Rewrite\Magento\Catalog\Plugin\Block;
use Magento\Catalog\Model\Category;
use Magento\Framework\Data\Collection;
use Magento\Framework\Data\Tree\Node;
class Topmenu
{
    public function afterGetCacheKeyInfo(\Magento\Theme\Block\Html\Topmenu $subject, array $result)
    {
        ...
    }
}
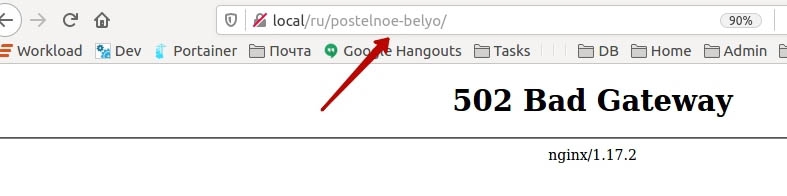
6. NGINX WEB SERVER SYSTEM PROBLEMS
After the Magento upgrade, you can even meet the system errors. In our example, we encountered such a problem: after reloading the page, some of them started to show the 502 Bad Gateway error.
 magento error bad gateway
The web server used for the site is Nginx. Its system logs showed the following error:

Error text: upstream sent too big header while reading response header from upstream
In our case, the solution was to edit the configuration file nginx.conf. We inserted the following lines into the HTTP section of the configuration file:
fastcgi_buffer_size 64k;
fastcgi_buffers 16 64k;
proxy_buffer_size 128k;
proxy_buffers 4 256k;
proxy_busy_buffers_size 256k;
During setup, you must restart the Nginx container and check its logs each time. The Nginx logs often suggest which parameters need to be adjusted: increased or decreased.
7. CANNOT ALLOCATE MEMORY ERROR
If you encounter this error during the upgrade, it means that there is not enough memory allocated for PHP processes. You cannot safely run Magento 2 on a server with less than 2GB of RAM. Your system must meet the minimum hardware requirements. Increase your memory limits to at least 2GB.
8. THERE ARE NO COMMANDS DEFINED IN THE "SETUP" NAMESPACE
There are several ways to fix the error:
- Give write permissions to the var and pub folders: chmod 755 var pub
- Check your custom modules, make sure that in each module the module.xml file exists and contains valid xml.
- Check your composer.json file. Sometimes an error can cause the Magento 2 update command to throw a “no commands defined” exception.
Conclusion
Updating Magento to a new version is a necessary process and at the same time quite complex despite the fact that it often requires a small number of operations. The main difficulties may arise during the upgrade and verification process errors associated with their own and third-party modules and even web server settings.
It is worth noting once again the main problems that can be encountered:
- Lack of necessary permissions to edit folders.
- Lack of RAM allocated for PHP processes.
- Outdated third-party Magento modules.
- Updating the overridden functions in the own module.
- Updating the overridden classes in the own module.
Nevertheless, now there is enough reference material for the timely resolution of these issues and the successful completion of the update.
Sources
