This article updates our previous "Magento Go: Custom Tabs on Product Details Pages" post. It describes how to enhance your Magento Go product details pages with custom Ajax tabs.
Here you can find new features that we added to our custom Ajax tabs solution.
1. Connect jQuery plugins easily
We found an easier way to connect jQuery plugins. All you need to do is the following:
a) Open Magento admin -> Configuration -> Design -> Theme Customization section.
b) Then select Java script editor.
c) Download the jQuery from official website and upload it to Magento Go.
d) Next, create the "jquerynocoflict.js" file with the following source code:
jQuery.noConflict();
and upload it to Magento Go.
Now you can add any jQuery plugins.
e) Create a file with the following code:
//Object for attribute item
var attrItem = function (attrname, data){
	this.attrName = attrname;
	this.data = data;
}

var newTabs = function (items){
	var gr = '';
	//if no arguments just make tabs
	if ( items === undefined ) {
		for(var i=0;i<attributes.length;i++) {
			gr += "
<dt class='tab'><span>"+attributes[i].attrName+"</span></dt>
<dd class='tab-container'>
<div class='tab-content'>"+attributes[i].data+"</div>
</dd>

";
		}
	}
	else {
		for(var i=0;i<items.length;i++) {
			//if item is just number make tab
			if (typeof items[i] == "number"  ) {
				if ( items[i] >= 0 && items[i] < attributes.length ){
					gr += "
<dt class='tab'><span>"+attributes[items[i]].attrName+"</span></dt>
<dd class='tab-container'>
<div class='tab-content'>"+attributes[items[i]].data+"</div>
</dd>

";
				}
			}
			//if item is group object make grouptab
			else {
				var tmp ='';
				for(var j=0;j<items[i].groupItems.length;j++) {
					if ( items[i].groupItems[j] >= 0 && items[i].groupItems[j] < attributes.length ){
						tmp += "
<tr>
<th class='label'>"+attributes[items[i].groupItems[j]].attrName+"</th>
<td class='data'>"+attributes[items[i].groupItems[j]].data+"</td>
</tr>

";
					}
				};
				if ( tmp != '' ){
					gr += "
<dt class='tab'><span>"+items[i].groupName+"</span></dt>
<dd class='tab-container'>
<div class='tab-content'>
<table class='data-table'>
<tbody>"+tmp+"</tbody>
</table>

";
				}
			}
		}
	}
	return gr;
}

jQuery(document).ready(function() {

	attributes = [];
	//first tab is description
	attributes[0]= new attrItem( jQuery('dl#collateral-tabs dt.tab:first span').text(), jQuery('dl#collateral-tabs dd.tab-container:first .std').html() );

	//get array of attributes
	jQuery('#product-attribute-specs-table tr').each(function(i){
		attributes[i+1] = new attrItem( jQuery(this).children('th').text(), jQuery(this).children('td').html() );
	});

	var tabs = newTabs();

	// var descr = attributes[0].data;
	// jQuery('.product-collateral').prepend(descr);

	//replace default tabs by new
	jQuery('dl#collateral-tabs').html(tabs);

	//call default function for tabs
	new Enterprise.Tabs('collateral-tabs');
});
Save it and rename to "tabsscript.js".
Next, go to Java script editor and upload this file to Magento Go.
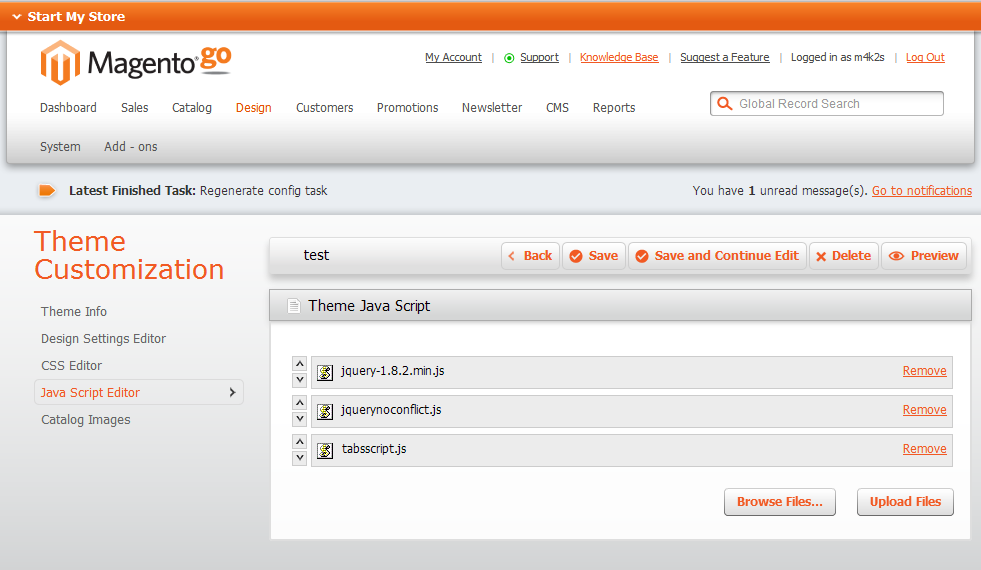
Check the order of the files, it should be:
1 - jquery.js (should be the first in the list)
2 - jquerynocoflict.js (second one in the list)
3 - tabsscript.js
Example:

f) Click "Save" and enjoy!
2. More flexibility. Organize your tabs using our new script
Take a look on this part of the code:
var tabs = newTabs();
The method newTabs() can have parameters now.
a) You can reorder your tabs.
You can enter the desired order of the tabs in [] brackets. Note that 0 - a description, 1, and further - product attributes.
Example:
var tabs = newTabs(attributes,[0,2,1,4,9]);
b) You can group your tabs.
Suppose you have a lot of attributes and they do not have enough space in the row. You can group them now:
Example:
    var tabs = newTabs([
	0,
	{groupName: 'test1', groupItems: [1,3] },
	2,
	{groupName: 'test3', groupItems: [4] },
    ]);
You can create as many groups as you want.
If you use parameters, you must specify numbers of all attributes you plan to use. Not defined attributes will be not visible.
If you will place wrong index it will be just ignored.
c) You can remove description from the tabs and use it anywhere else.
To do that, find following code:
// var descr = attributes[0].data;
// jQuery('.product-collateral').prepend(descr);
and uncomment it. Description will appear before the tabs. Of course you can change selector and place it in different place on the page.
More examples:
Example 1.
3-rd attribute will be removed, since it is not defined in the array.
var tabs = newTabs(attributes,[0,1,2,4]);
Example 2.
It makes 4 tabs: test1, test2, test3 and test4. Description will be added in each tab.
var tabs = newTabs(attributes,[
		{groupName: 'test1', groupItems: [0,1] },
		{groupName: 'test2', groupItems: [0,2,3] },
		{groupName: 'test3', groupItems: [0,4] },
		{groupName: 'test4', groupItems: [0,1,2,3,4] }
	]);
Further reading:
Magento Go: Custom Tabs on Product Details Pages
Compare Magento Community and Magento Go


